The challenger series boards

Introduction
The challenger series boards is our interpretation of Adafruit’s popular Feather form factor. The Feather factor is small enough to fit on standard bread boards, making it easy to build and prototype your designs, but it is still big enough to hold many of the advanced functions that you may need for your projects. We have tried our best to make it easy for you to select one of our boards by simply providing them in many different variants.
The standard Challenger boards comes with a connector for connecting a LiPo battery and a built in charger. The charge circuit can charge the battery when the board is connected either to a USB Type C cable or if +5 Volt is applied to the USB pin.
Form factors
Now, although the Challenger/Feather form factor is great for battery powered applications, not all applications will be battery powered. So we decided to modify the existing form factor by simply removing the battery charger and connector and instead add a few extra IO pins in that space and viola, the Challenger NB (NB for no battery) format was born. The picture below shows the differences between the two formats in more detail.

Connectivity
The challenger boards follows Adafruits placement for the three main communication interfaces, UART0, I2C and SPI, and if you are working in the Arduino environment chances are your old sketch’es will work from the start.
Depending on what module you choose to work with, at least one of the available interfaces will be occupied for communicating with the on board peripherals. For instance on the Challenger WiFi boards the second UART on the micro controller will be used to communicate with the WiFi chip. On the LoRa boards and the SD boards it is the second SPI interface that is used to interface to the on board peripherals. Note that this does not affect the external pins on the board in any way. All on board functions are independent from the available pins.
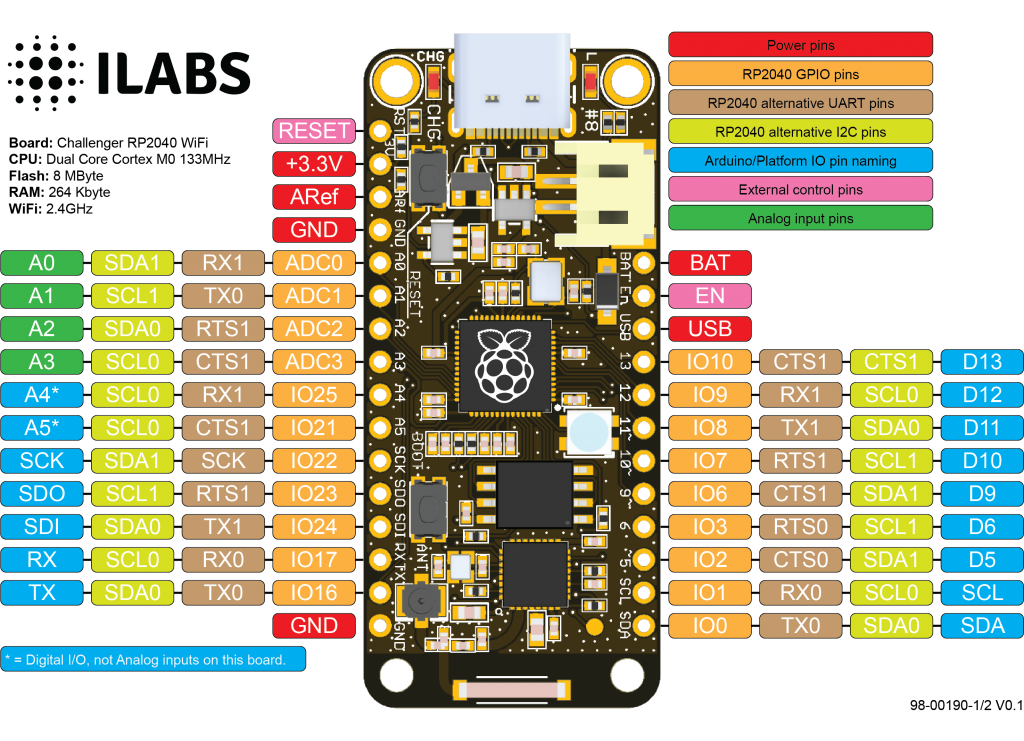
What MCU’s do we use
We started out using Microchip’s SAMD21 MCU’s as we were using them in large quantities in other industrial projects. However at the time of writing this it is basically impossible to get hold of these chips and lead times are quoted at over 52 weeks. So we started looking elsewhere and found the RP2040 device from the Raspberry Pi Foundation. And although this chip is a bit simpler in its architecture and does not have the advanced low power functions of the SAMD MCU, it is actually a very decent processor. And best of all, it is actually obtainable.
More information about the RP2040 is available here: https://www.raspberrypi.org/products/rp2040/specifications/
We also use Bluetooth enabled MCU’s from Nordic Semiconductor for a few projects.